As we have explained in the previous Troldesh ransomawre blog, Cyber criminals are now spreading and infecting ransomware by gaining access to computers through Remote Desktop. Remote access to the victim’s computer is gained by using brute-force techniques which can effectively crack weak passwords.
Typically, the attacker scans a list of IP ranges for RDP port 3389(default RDP port) which are open for connection. Once an attacker finds a port, they launch the brute-force attack. The brute-force technique uses a trial and error password guessing attack with a list of commonly used credentials, dictionary words, and other combinations. There are several tools available in the internet that performs the above Port scanning and RDP Brute forcing with ease.
Once the access is gained, criminals simply disable the system’s antivirus and run the payload. This means, even if the antivirus is updated and has a detection against the malware, turning off its protection renders the system defenseless.
However, Quick Heal Firewall feature can effectively prevent such unauthorized access by configuring it to allow only trusted IP addresses from accessing the system via Remote Desktop.
Configuring Firewall:
First we need to create a rule to block RDP connections from any incoming systems. Then we create an exception rule to allow only specific systems from being able to bypass the first rule and access the systems RDP.
For Seqrite EPS Products:
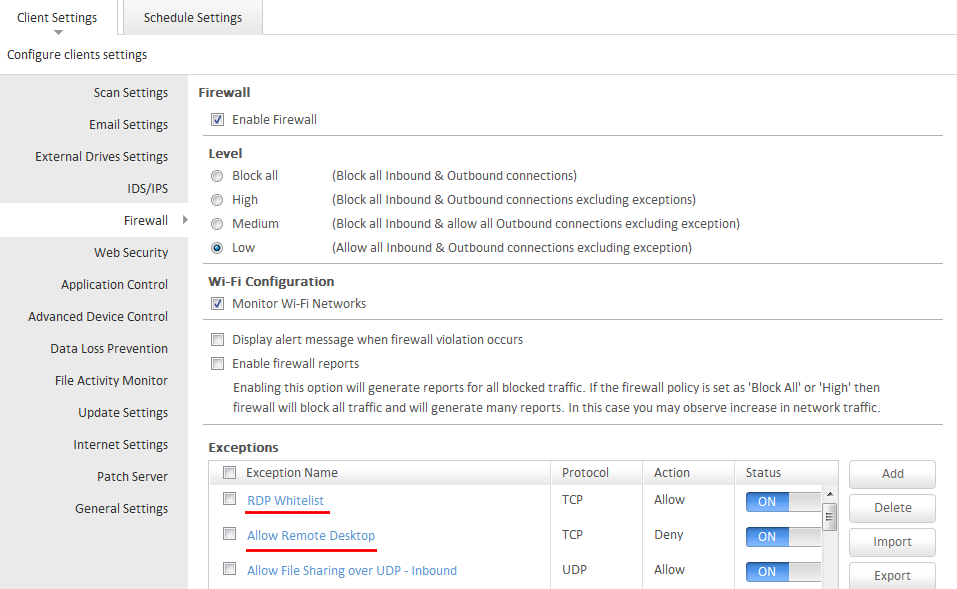
Login to the EPS Console => Select Settings Tab => Firewall.
Note: These settings will be applicable to all clients under the default policy.
For other Groups created, the configuration should be made on its respective policy.

For Quick Heal Standalone Products:
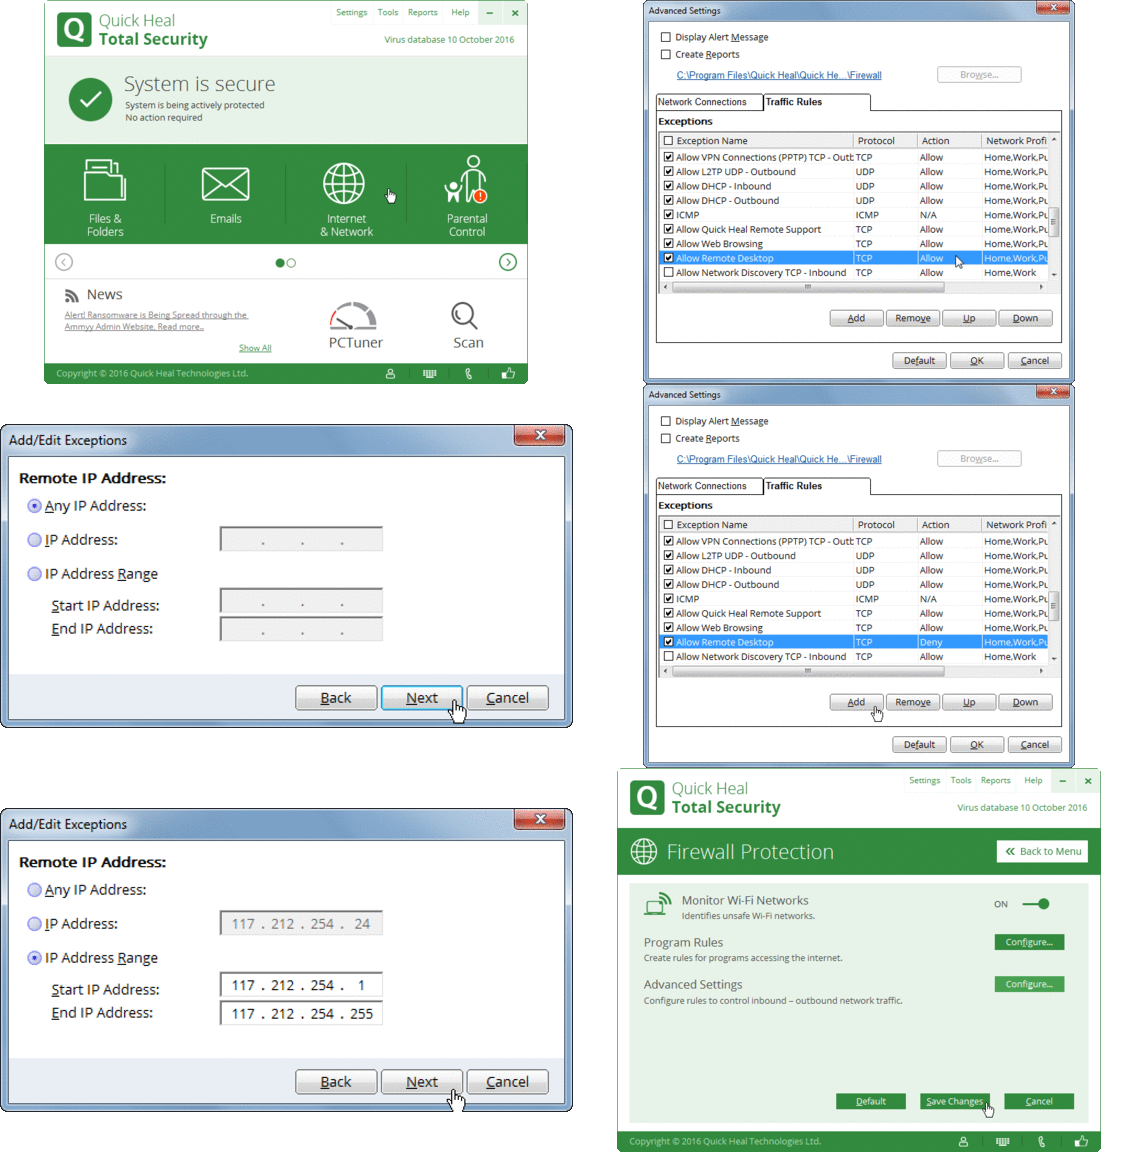
Open Quick Heal Dashboard => Select Internet and Network => Firewall Protection=> Advanced Settings – Configure=> Traffic Rules.
1) To block all RDP connections:
- Scroll down and double click on the Allow Remote Desktop rule.
- Click on Next till you reach the last window i.e Select Action
- Here change the action from Allow to Deny and click on Finish.
2) To add exception for trusted systems:
- In the Traffic rule window click on Add for adding an exception.
- Give any Name for the rule eg. RDP White-list and select Next twice.
- In the Local TCP/UDP Port window enter the RDP port in the Specific port option and click Next. By default the RDP port is 3389.
- In the Remote IP Address enter the IP address of the system from which you would want to accept RDP connections.
- You can also enter an IP range to allow RDP connections from multiple systems of the specified range. Eg. 192.168.0.1 to 192.168.0.255.
- Select Next for the Remote TCP/UDP port window.
- Select action to be taken as ‘Allow’ in the last window and click finish.
Now save the changes made by clicking on OK and selecting Save Changes.
Note: Make sure that the RDP White-list rule is higher than the Allow Remote Desktop rule in the Firewall rule list.

Other Security practices to help avoid RDP brute-forcing attacks.
– Use strong and unique passwords on user accounts that cannot be easily breached. Weak passwords like Admin, admin@123, user, 123456, password, Pass@123, etc., can be easily brute-forced in the first few attempts itself.
– Configure password protection for your security software. This would prevent any unauthorized users accessing the system from disabling or uninstalling it. Quick Heal users can enable this feature from the Settings => Password Protection.
– Disable the Administrator account and use a different account name for administrative activities. Most brute-force attempts are done on an Administrator user account as it is present by default. Also, remove any other unused or guest accounts if configured on the system.
– Change the default RDP port from the default‘3389’. Most attacks of such type focus on targeting the port 3389 of RDP.
– Enable Network Level Authentication (NLA) feature in your RDP settings available in Windows Vista and later OS.
Ref: https://technet.microsoft.com/en-us/library/cc732713.aspx
– Configuring Account Lockout Policies that automatically lock the account after a specific number of failed attempts. This feature is available in Windows and the threshold can be customized as per the administrator.
Ref: https://technet.microsoft.com/en-us/library/dd277400.aspx


